
The Gokyo Lakes trek in Nepal is one of the most scenic routes in the Himalayas and a quieter alternative to the Everest Base Camp trek.
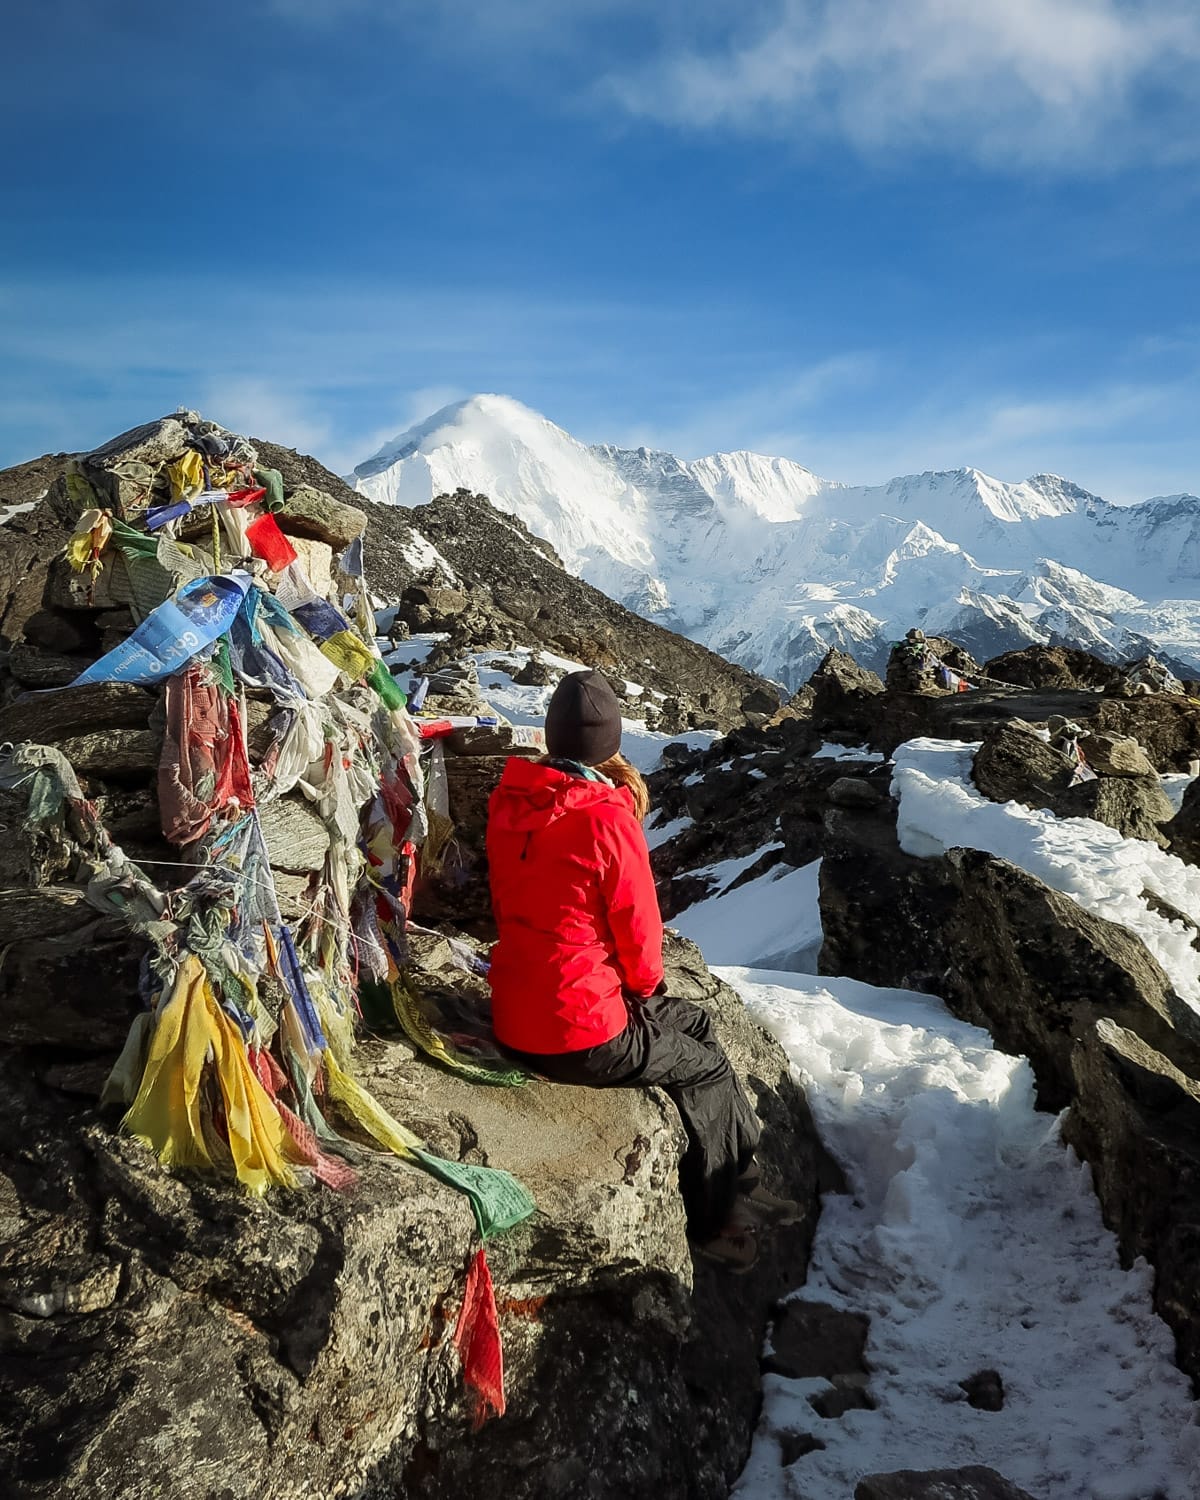
Over 2 weeks, we hiked past glacial lakes, stayed at cozy teahouses in remote mountain villages, and summited Gokyo Ri at 5,357m for a breathtaking 360° view of the world’s highest peaks, including Everest.
We chose this route after hearing it was less crowded and offered more expansive views than the Everest Base Camp trail, and we’re so glad we did.
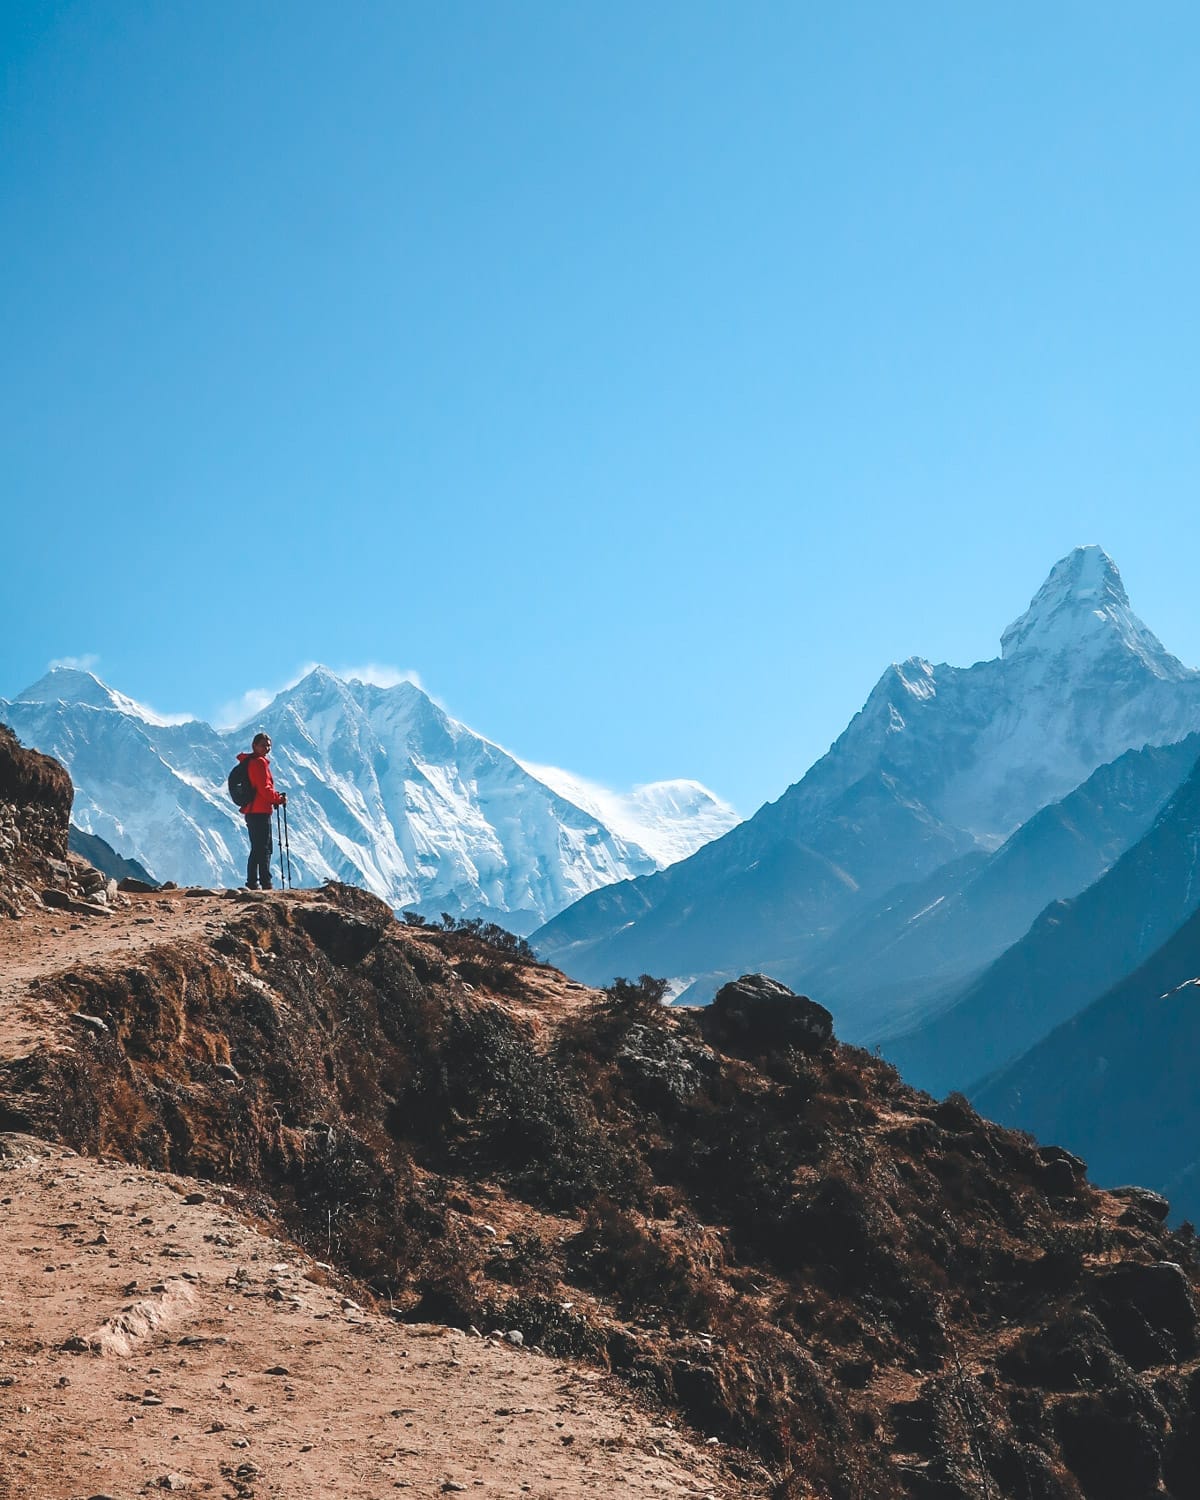
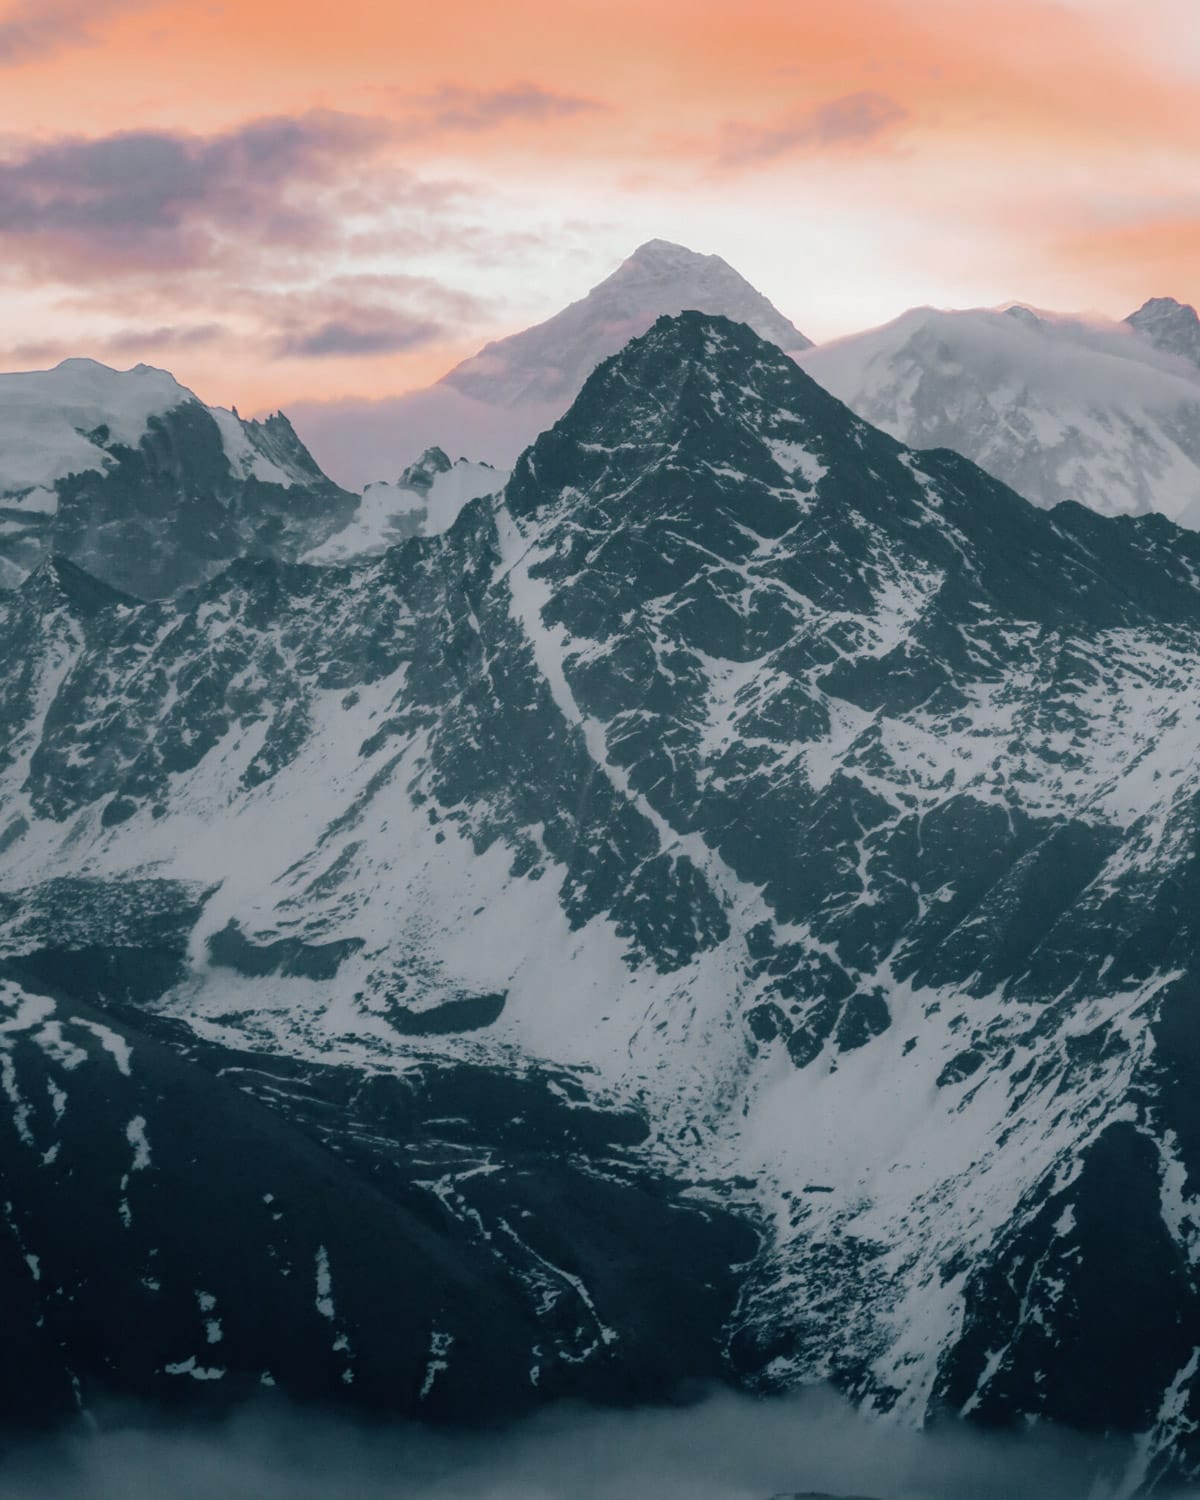
Unlike the Kala Patthar viewpoint on the EBC trek, Gokyo Ri gives you a broader panorama of Everest, Lhotse, Makalu, Cho Oyu, sweeping glaciers, and turquoise lakes far below.
The memories we made along the way are something we’ll never forget: meeting locals, bundling up in -20°C sleeping bags, playing Nepali card games, and drinking masala tea after long trekking days.
In this guide, we cover the Gokyo Lakes & Gokyo Ri itinerary, what to expect, and our best tips for staying healthy, choosing a guide, and getting the most out of your trek.
Gokyo Ri trek itinerary in a nutshell
Here’s a breakdown of the 2-week Gokyo Lakes and Gokyo Ri trek itinerary, including daily altitudes:
- Day 1: Arrive in Kathmandu
- Day 2: Trek preparation in Kathmandu
- Day 3: Fly to Lukla and trek 3-4 hours to Phakding (2,610m)
- Day 4: Hike 5-6 hours to Namche Bazaar (3,440m)
- Day 5: Acclimatization day in Namche Bazaar (2 hour hike up to Hotel Everest View and back down)
- Day 6: Hike 5-6 hours to Phorse (3,810m)
- Day 7: Hike 5-6 hours to Machhermo (4470m)
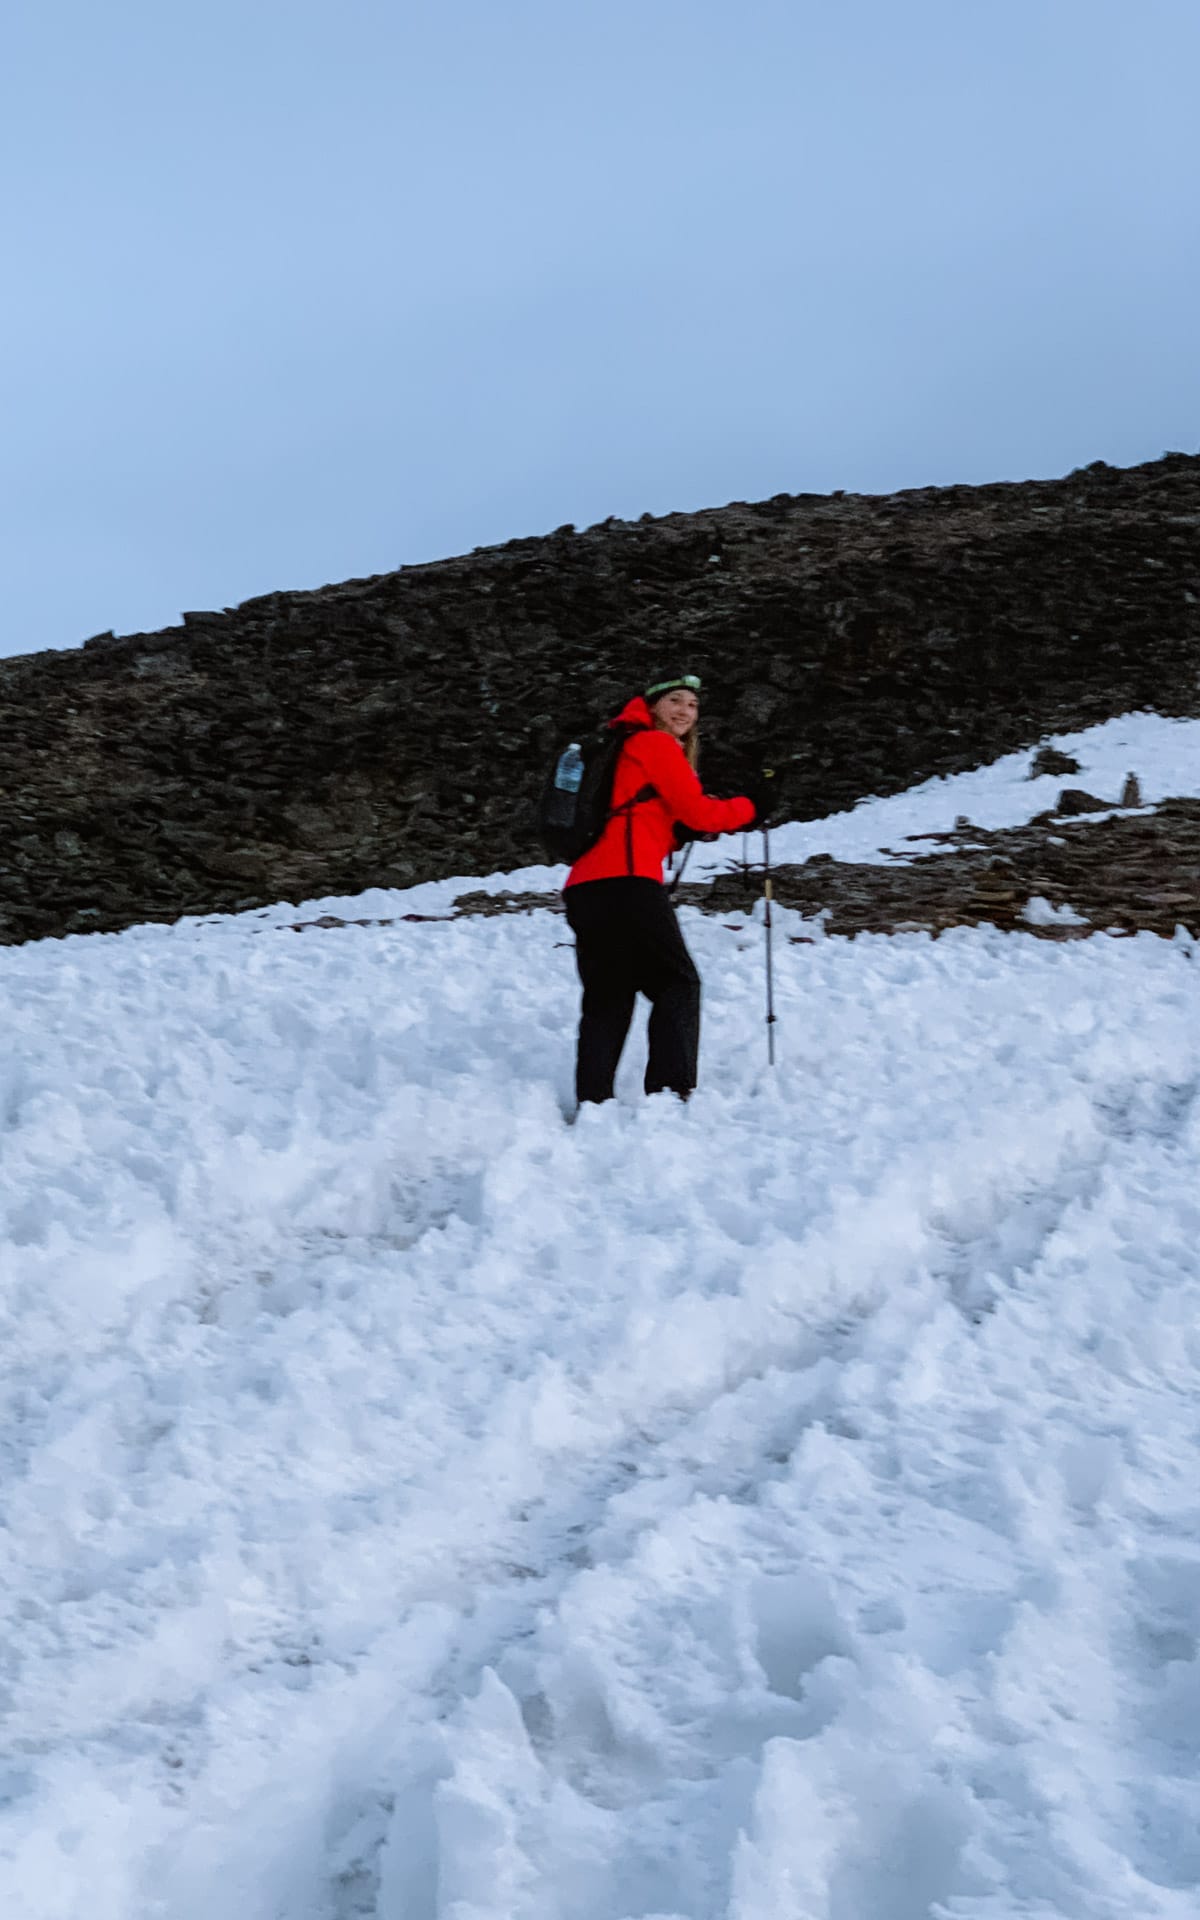
- Day 8: Hike 5-6 hours to Gokyo Lakes and Gokyo village (4,750)
- Day 9: 4-6 hour final ascent up Gokyo Ri (5,357m) and hike to the fifth lake
- Day 10: Hike 3-4 hours back to Dole (4,038m)
- Day 11: Hike 4-5 hours to Namche Bazaar (3,440m)
- Day 12: Hike 6-8 hours to Lukla (2,800m)
- Day 13: Fly to Kathmandu
- Day 14: Fly home
When to trek in Nepal: The best seasons for clear views

The best times to trek in Nepal are during the fall (September-November) and spring (March-May) seasons, when the weather is typically dry and mild. These months give you the best chance of clear skies and stable conditions.
For the Gokyo Lakes trek specifically, both seasons work well - but keep in mind that in early spring, the lakes may still be frozen. If you're hoping to see that vibrant turquoise colour, aim for a fall visit.
We did our trek at the beginning of April, and locals told us winter had lasted longer than usual. A snowstorm rolled in during our final days on the trail, which was apparently out of character for that time of year.
Good vs. Bad Guiding in Nepal

We saw examples of both good and bad guiding on our trip, which we’ll touch on throughout this article. The key to a good guide is experience and sound judgment - it’s their job to look after your well-being, arrange accommodation, and manage the itinerary.
You can do this route on your own, but there are moments when having a guide isn’t just helpful, it’s critical for your safety.
We chose Himalayan Glacier because of their long track record, excellent reviews, and the fact that they’re a Nepali-run company, not a foreign outfit. Their website lays out the trek in detail, and we were matched with an awesome guide and porter who made the experience even better.
The Gokyo Lakes and Gokyo Ri trek with Himalayan Glacier costs $3,299 USD per person for the 14 days and includes meals, accommodation, an English-speaking guide, porters, regional flights, entrance fees, trekking permits, a sleeping bag and down jacket rental, and a waterproof duffel bag.
Read Himalayan Glacier reviews.Accommodation on Gokyo Ri trek
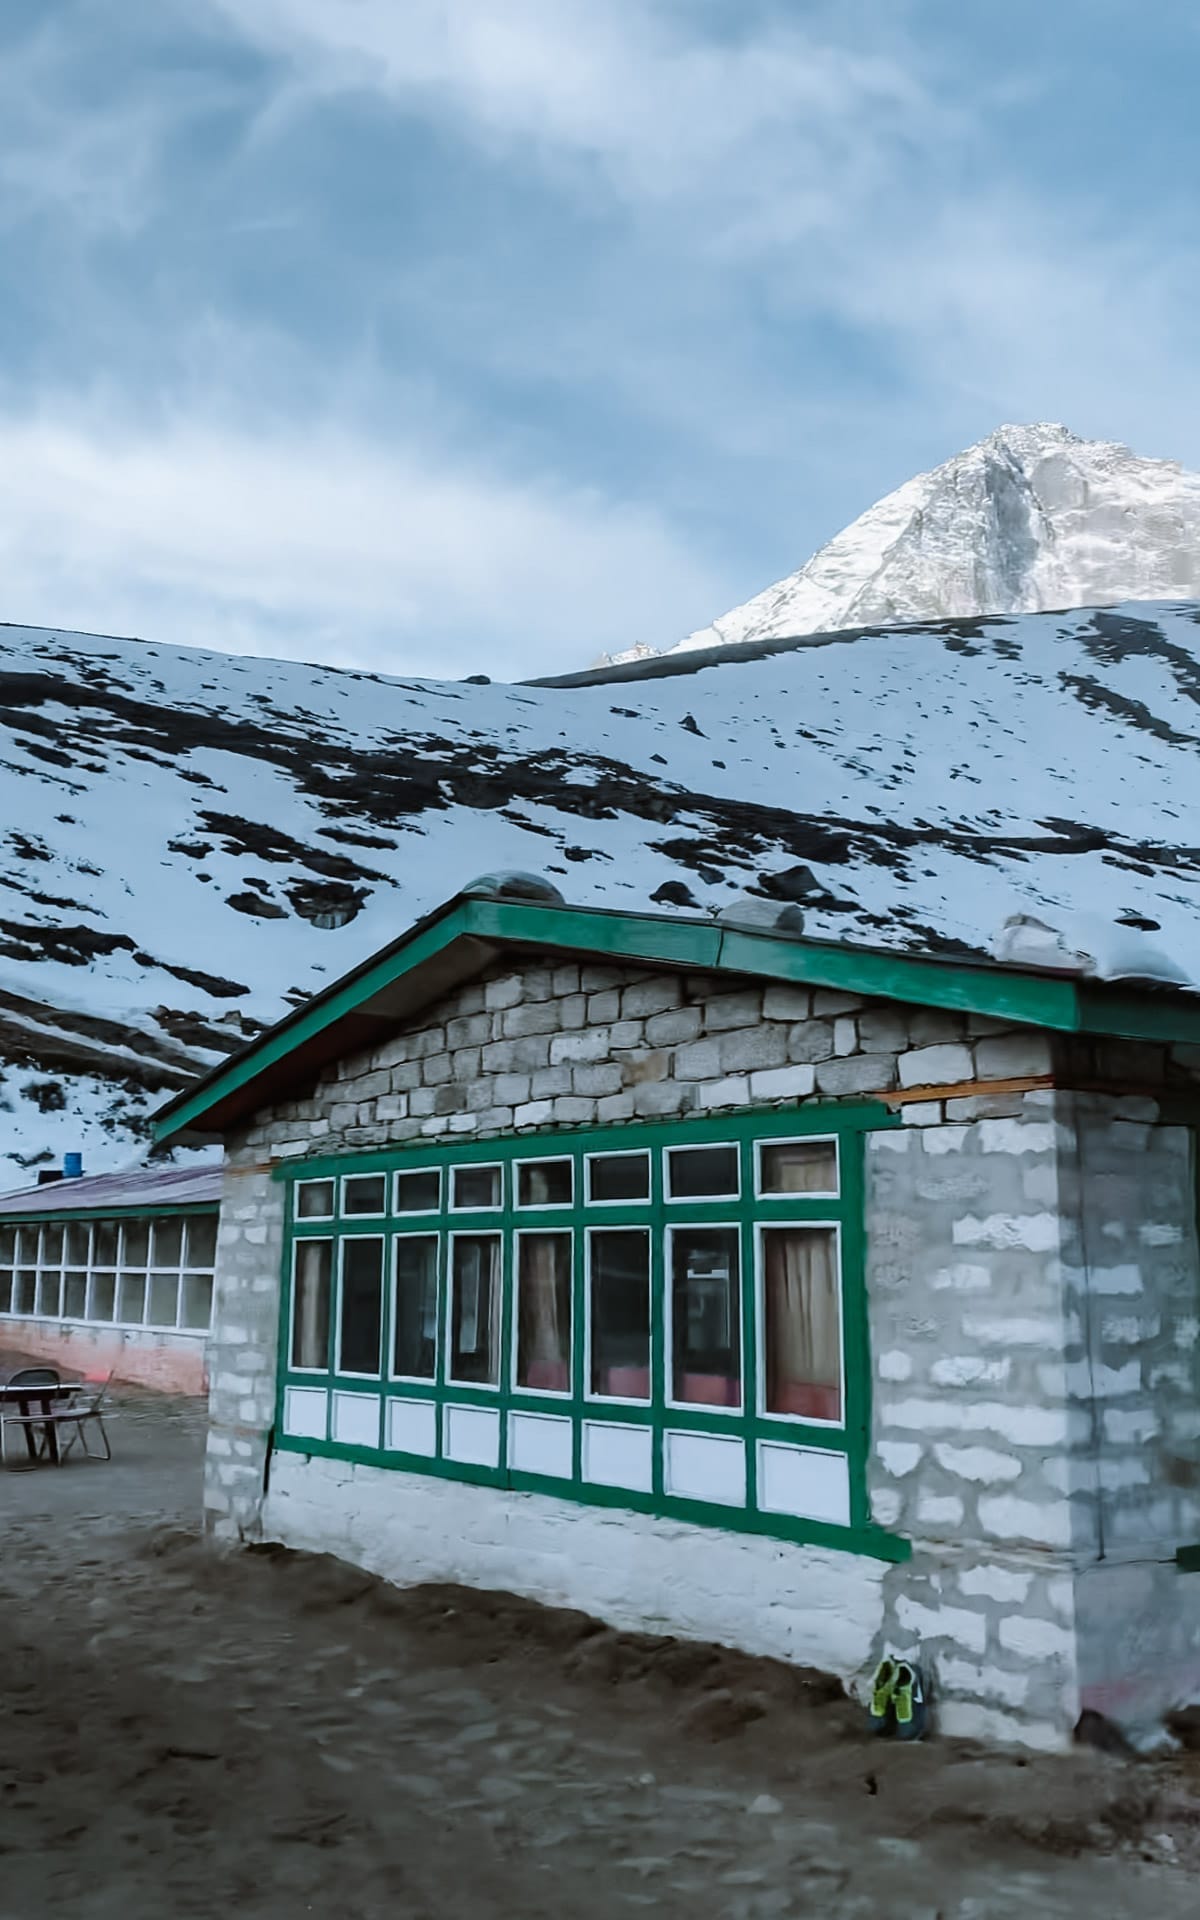
Teahouse in Gokyo Village | Teahouse in Machermo
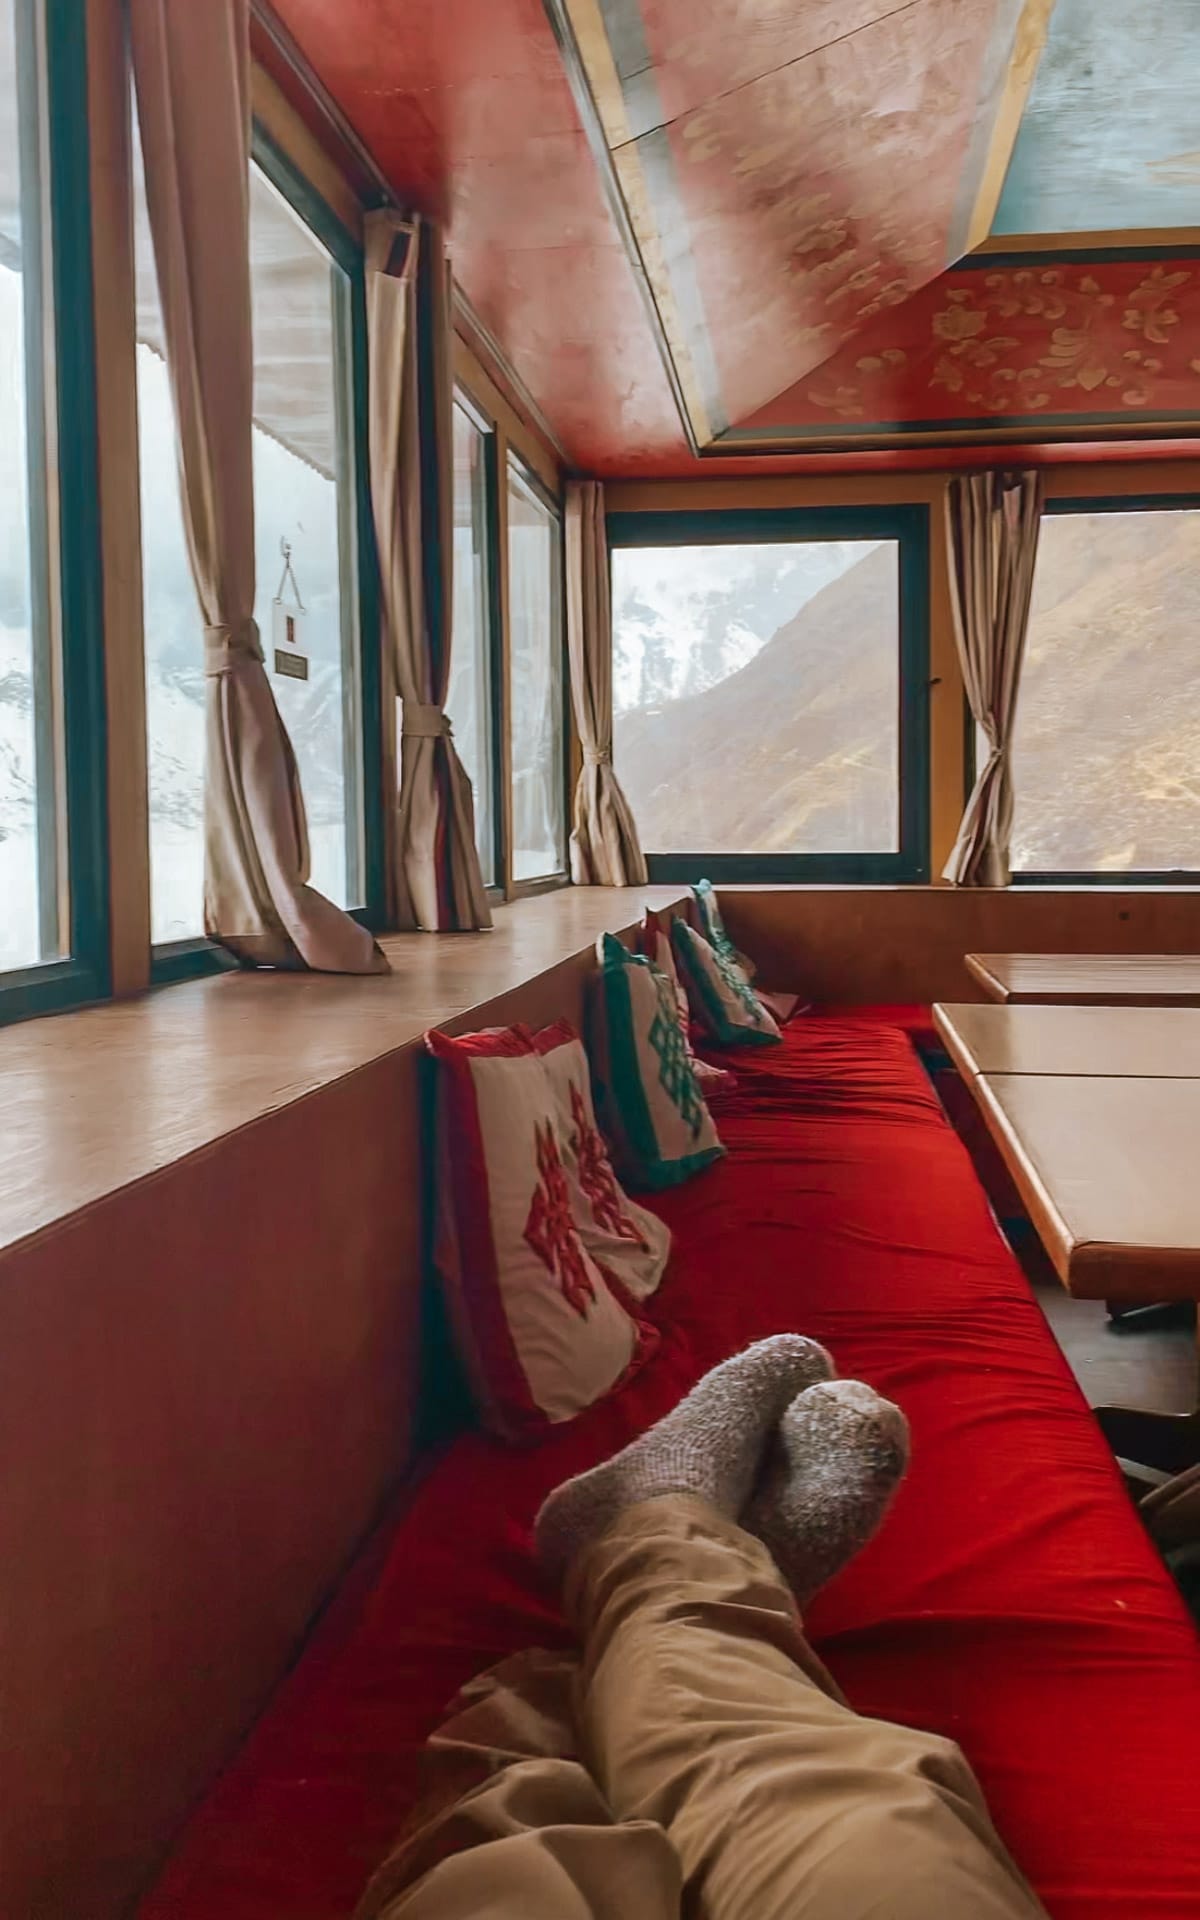
Teahouses are cozy little refuges where you eat and sleep along the trail. Most have private bedrooms and a shared common area where meals are served.
Some have Western toilets, while others have squat toilets - if having a Western toilet is important to you, it's worth asking your tour company about this when booking.
Rooms aren’t typically heated, so they get cold at night. The dining area usually has a central stove, but not always - so bring warm layers!
The common areas are a big part of the experience. Trekkers gather around tables to drink tea, eat, and play games, while guides and porters often hang out near the kitchen to do the same.
One of the highlights of our trek was learning a Nepali card game called Dhumble. Ask your guide to teach you - we played for hours! On days with only 3–4 hours of trekking, it was the perfect way to pass the time. We also brought Scrabble, which turned out to be a great call.
Eating on the trail: Teahouse food + what not to order
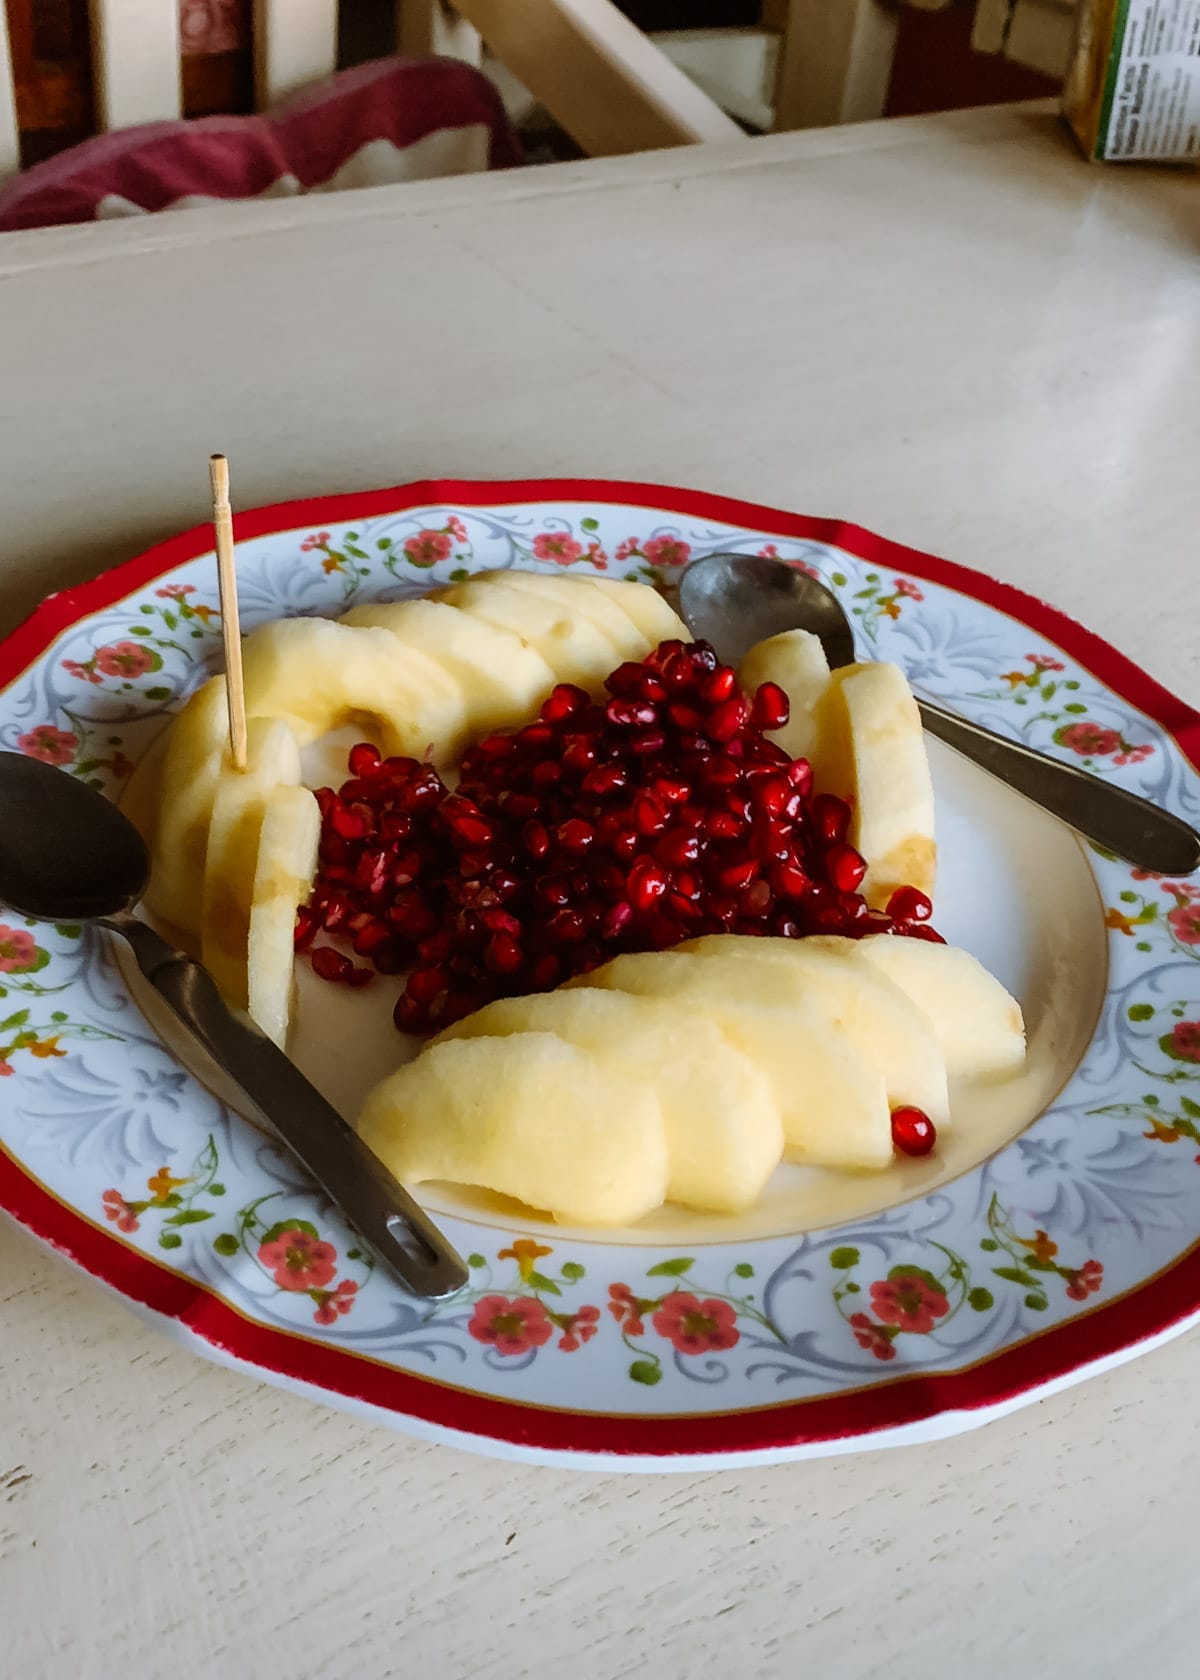
All teahouses have menus with a variety of food: dumplings called momo, noodle soup, dal bhat (rice with curry and lentil soup), pasta, fried rice, and sometimes even sandwiches, meat, or pizza.
That said, the higher you go, the more everything starts to taste the same - and the quality definitely drops.
One of the most important things to remember: don’t eat meat after Namche Bazaar, the last major town before you head into the truly remote part of the mountains.
After Namche, our guide strictly told us not to order meat since it’s not guaranteed to be fresh. We soon realized this also applied to cheese when the awful yak cheese pizza we ate the night before our ascent up Gokyo Ri made us sick. Not fun at 5,000m.
Stick to plain, easy-to-digest foods after Namche. Dal bhat, noodles, fried rice, and for breakfast, chapati with an omelet or toast. Trust us, the yak cheese pizza with shredded carrots nearly came back up more than once on the way up to Gokyo Ri.
Namche Bazaar: The gateway to Everest
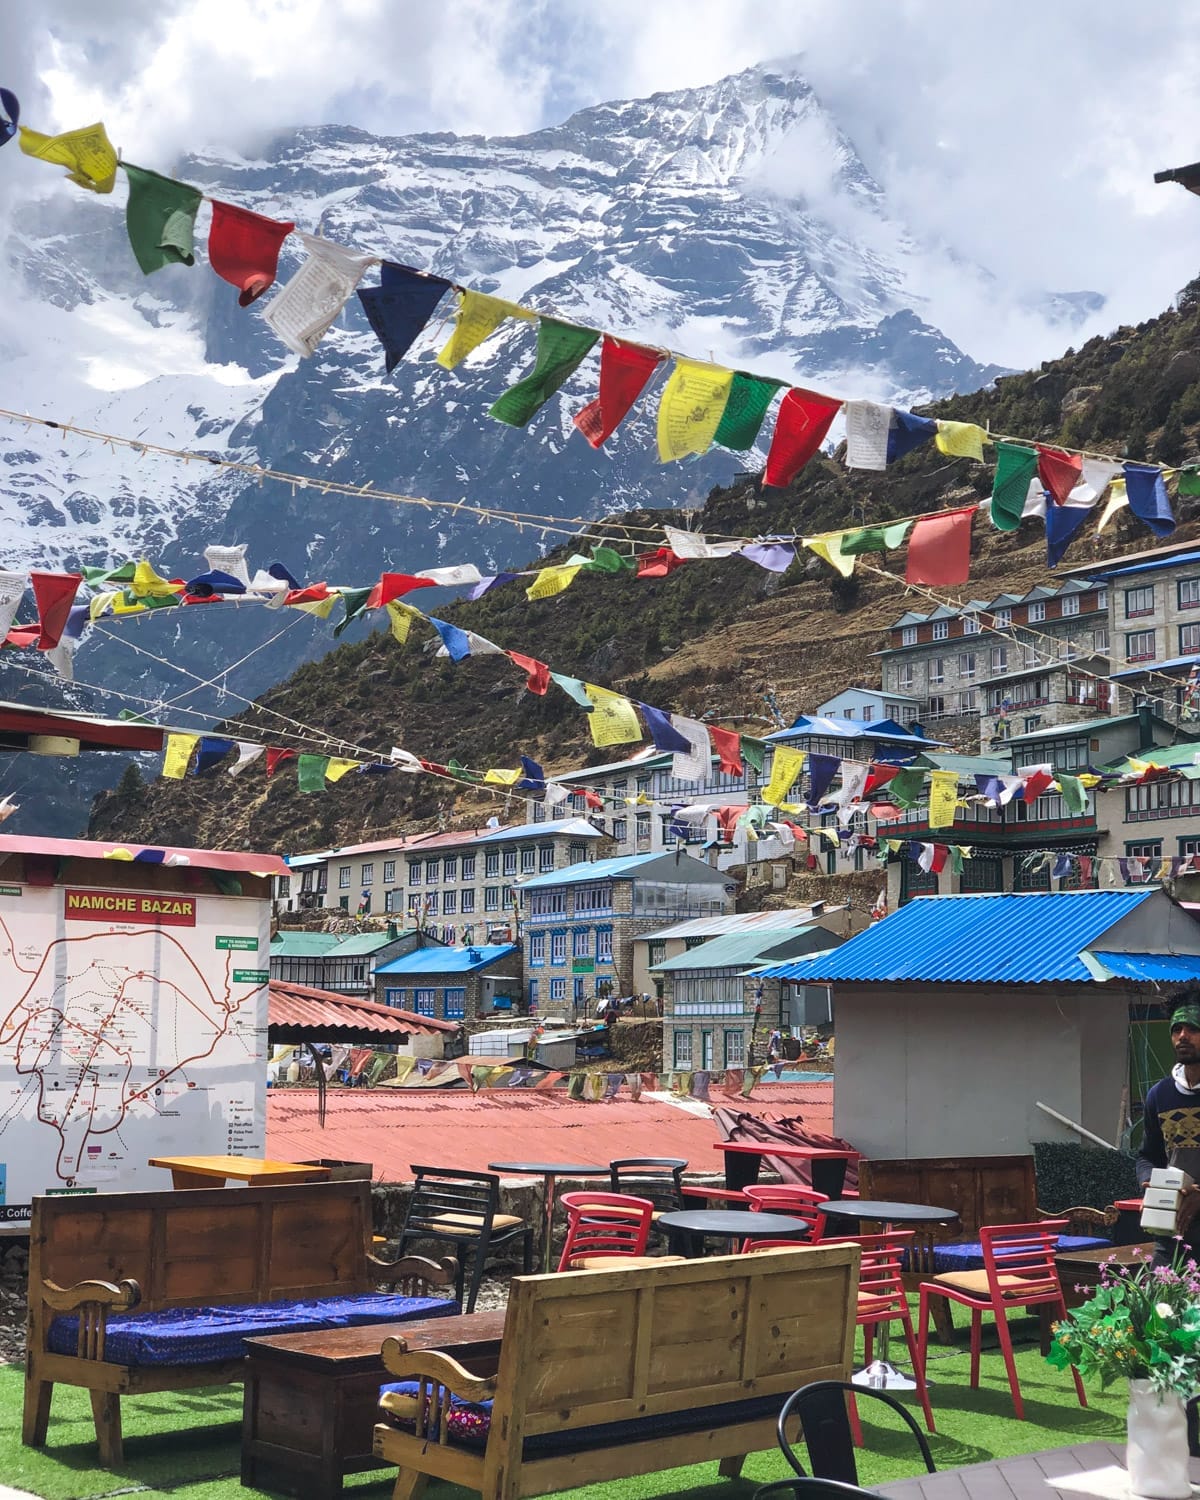
In Namche, you can find pretty much everything you need, from proper espresso to a sauna. We stocked up on supplies here for the rest of the trek: a buff for warmth, toilet paper, chocolate bars, and some shampoo.
You’ll pass through Namche on the way up and again on the way down, and returning feels like a tremendous milestone.
The accommodations in Namche are nice. Khumbu Lodge, where we stayed, even had heated blankets!
The food is good, the beds are warm, and if you can, try to find chicken sizzlers (grilled chicken on a hot plate). We had them multiple times - they were our favourite meal of the trek.
Namche is also where you'll spend a couple nights to take an acclimatization day, usually involving a hike up to Hotel Everest View and back down. This stop is important for adjusting to the high altitudes ahead.
High altitude tips
The Gokyo trek takes you to high altitudes of over 5,000 meters - and the truth is, you never know how your body will respond until you’re up there. Some people start feeling symptoms of altitude sickness as low as 2,500m, and it can get rough fast.
It’s important to know the warning signs: headache (especially in the back of the head), nausea or vomiting, dizziness, and shortness of breath.
If you feel any of these symptoms, put your ego aside and talk to your guide. If needed, they’ll make the call to turn back - and unfortunately, that usually means your trek is over and it’s time to descend.
The night before our ascent to Gokyo Ri, we arrived in the village of Gokyo (5,000m) and saw a woman showing possible signs of altitude sickness.
A chaotic scene unfolded: a local doctor noticed her distress and rushed over to help, uninvited. Her guide was already giving her oxygen, and the two got into a heated argument, with the doctor repeating, “I’m a doctor - do you want my help or not?”
Did her guide take her up too quickly? Did he get a cut for a helicopter rescue? Was the doctor pressuring to take her into his care for money? We don’t know who was right, but moments like this are when you really want an experienced guide and tour company you can trust.
Eventually, a helicopter rescue arrived, and she was airlifted back to Kathmandu. The cost? Around $5,000 USD.
One of the best ways to prevent altitude sickness is to take Acetazolamide (often sold under the brand name Diamox) from your travel doctor.
We’ve used these inexpensive pills daily at altitudes above 2,500m in Peru, Kyrgyzstan, and Nepal, and we’ve never had issues with altitude sickness.
The next best thing is drinking 3L of water a day. It’s tough, especially at high elevation, but the higher you go, the more important it becomes. Water is your best friend up there - a dehydration headache at 4,900m is no joke.
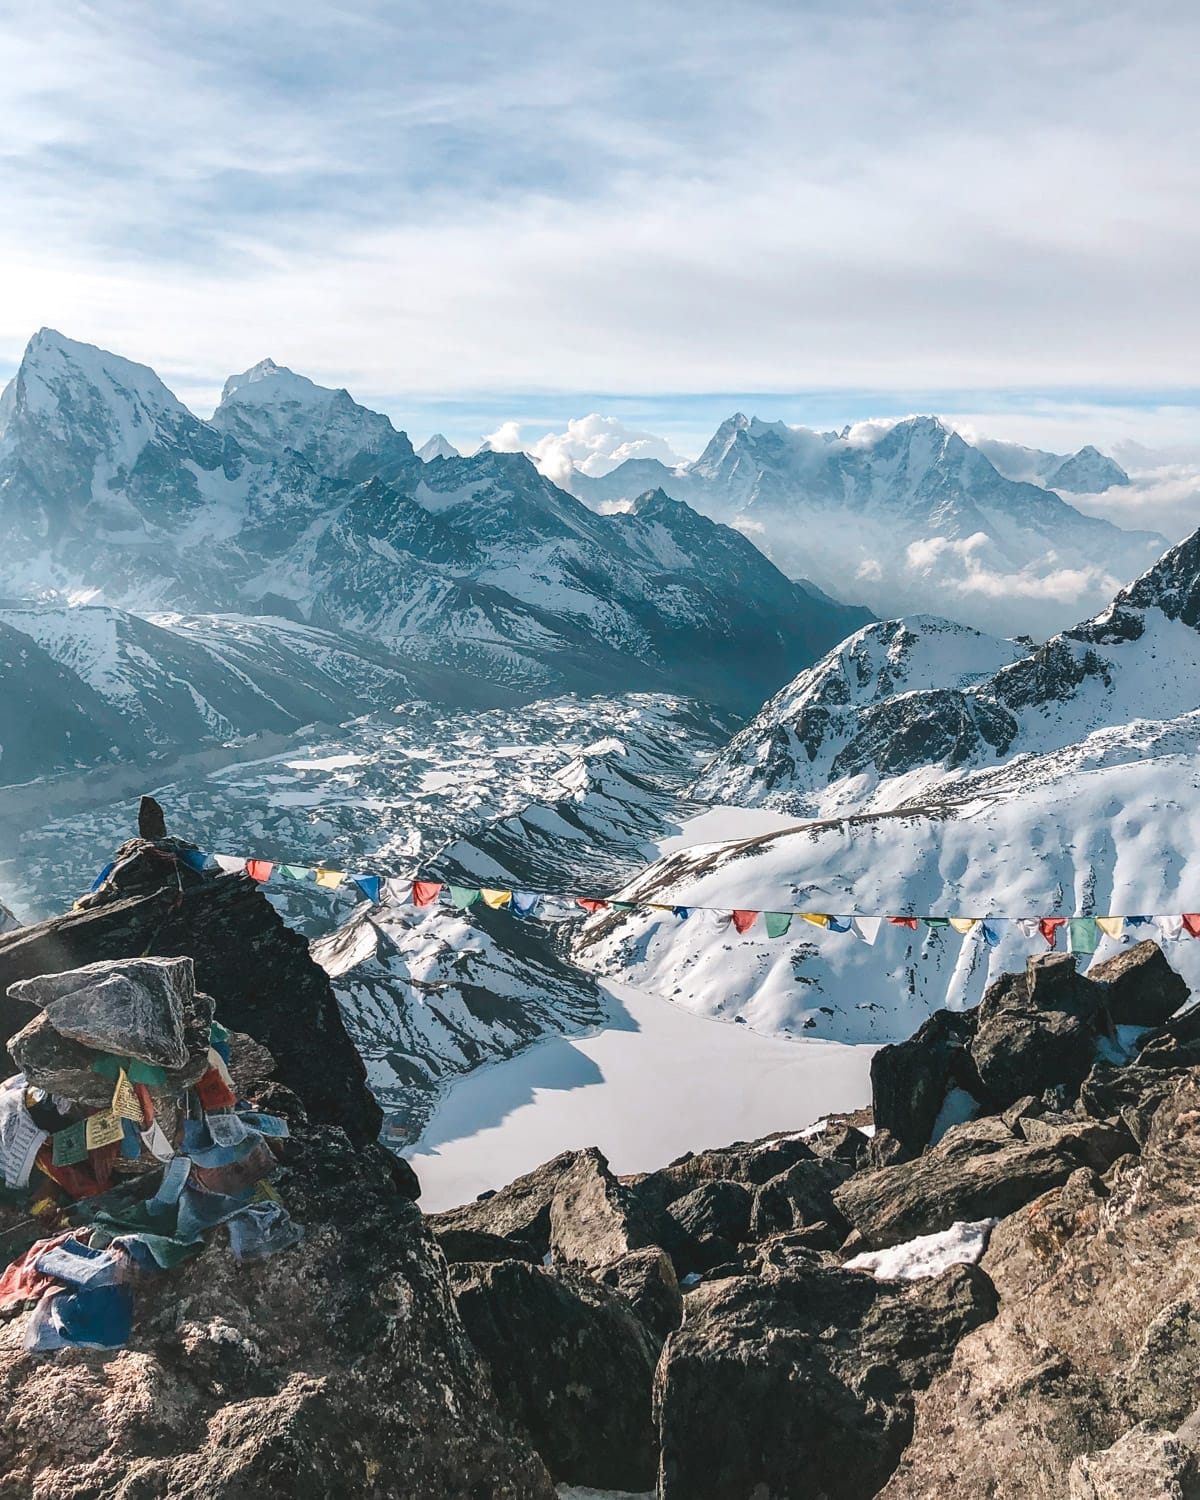
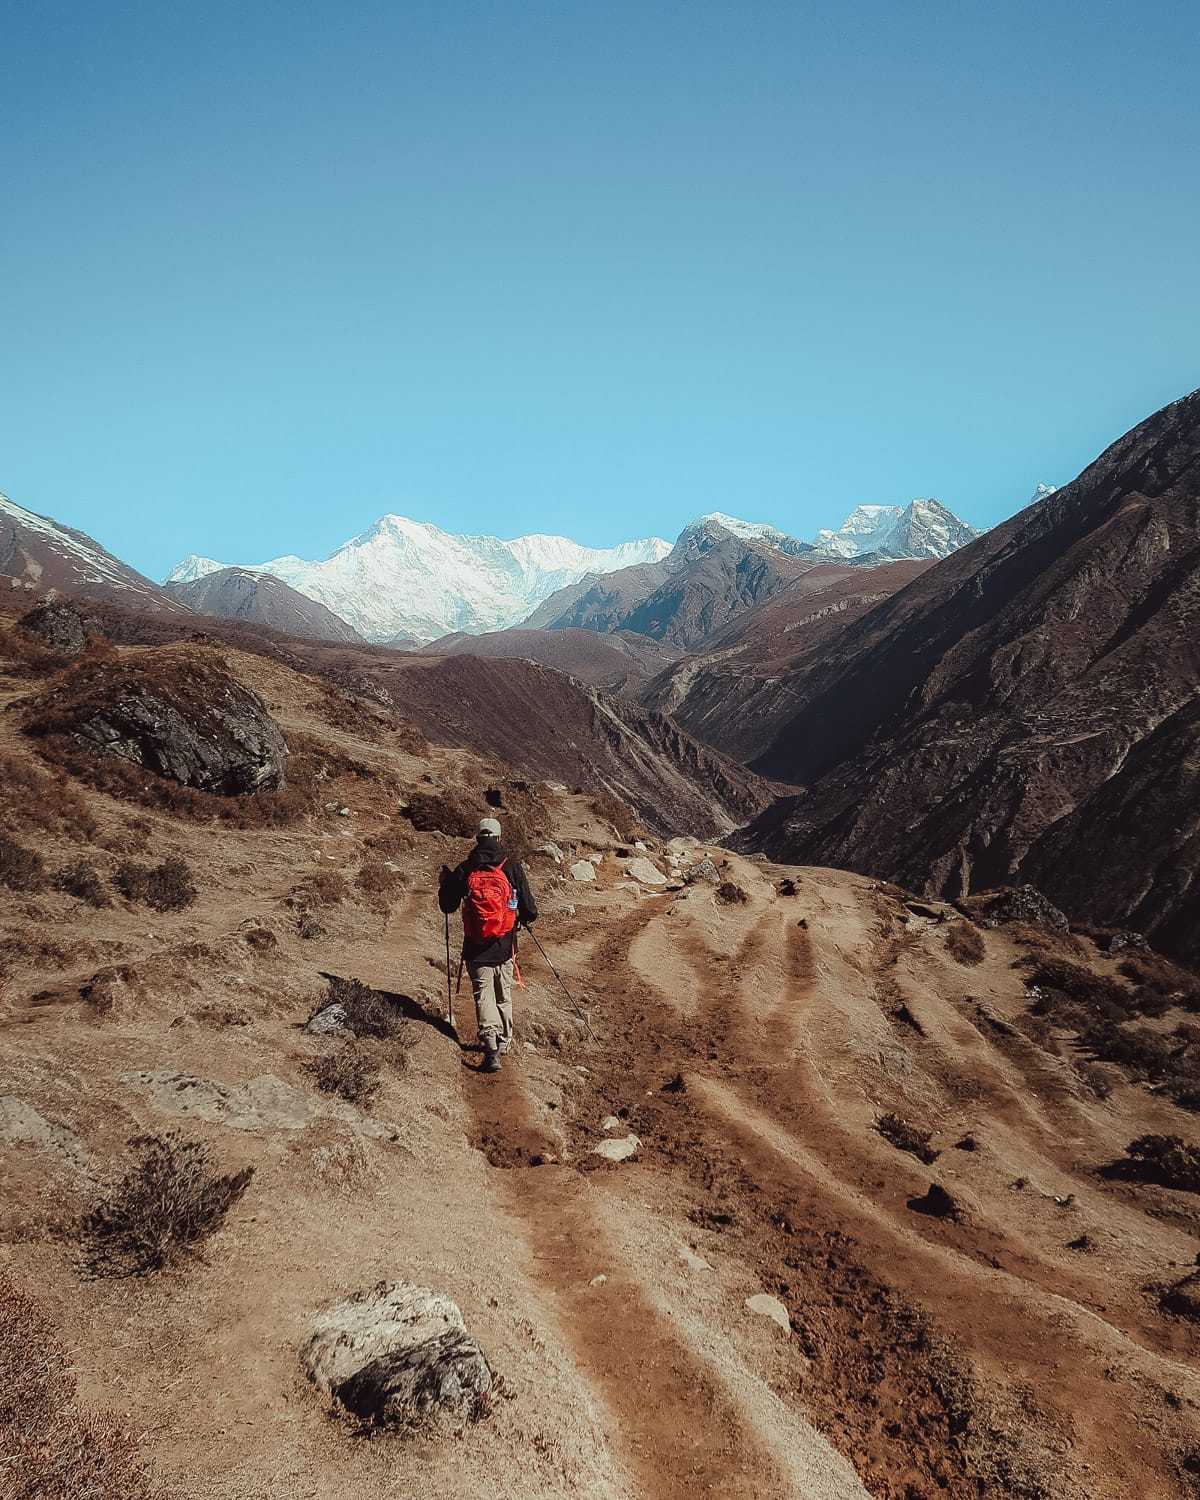
The final ascent up Gokyo Ri
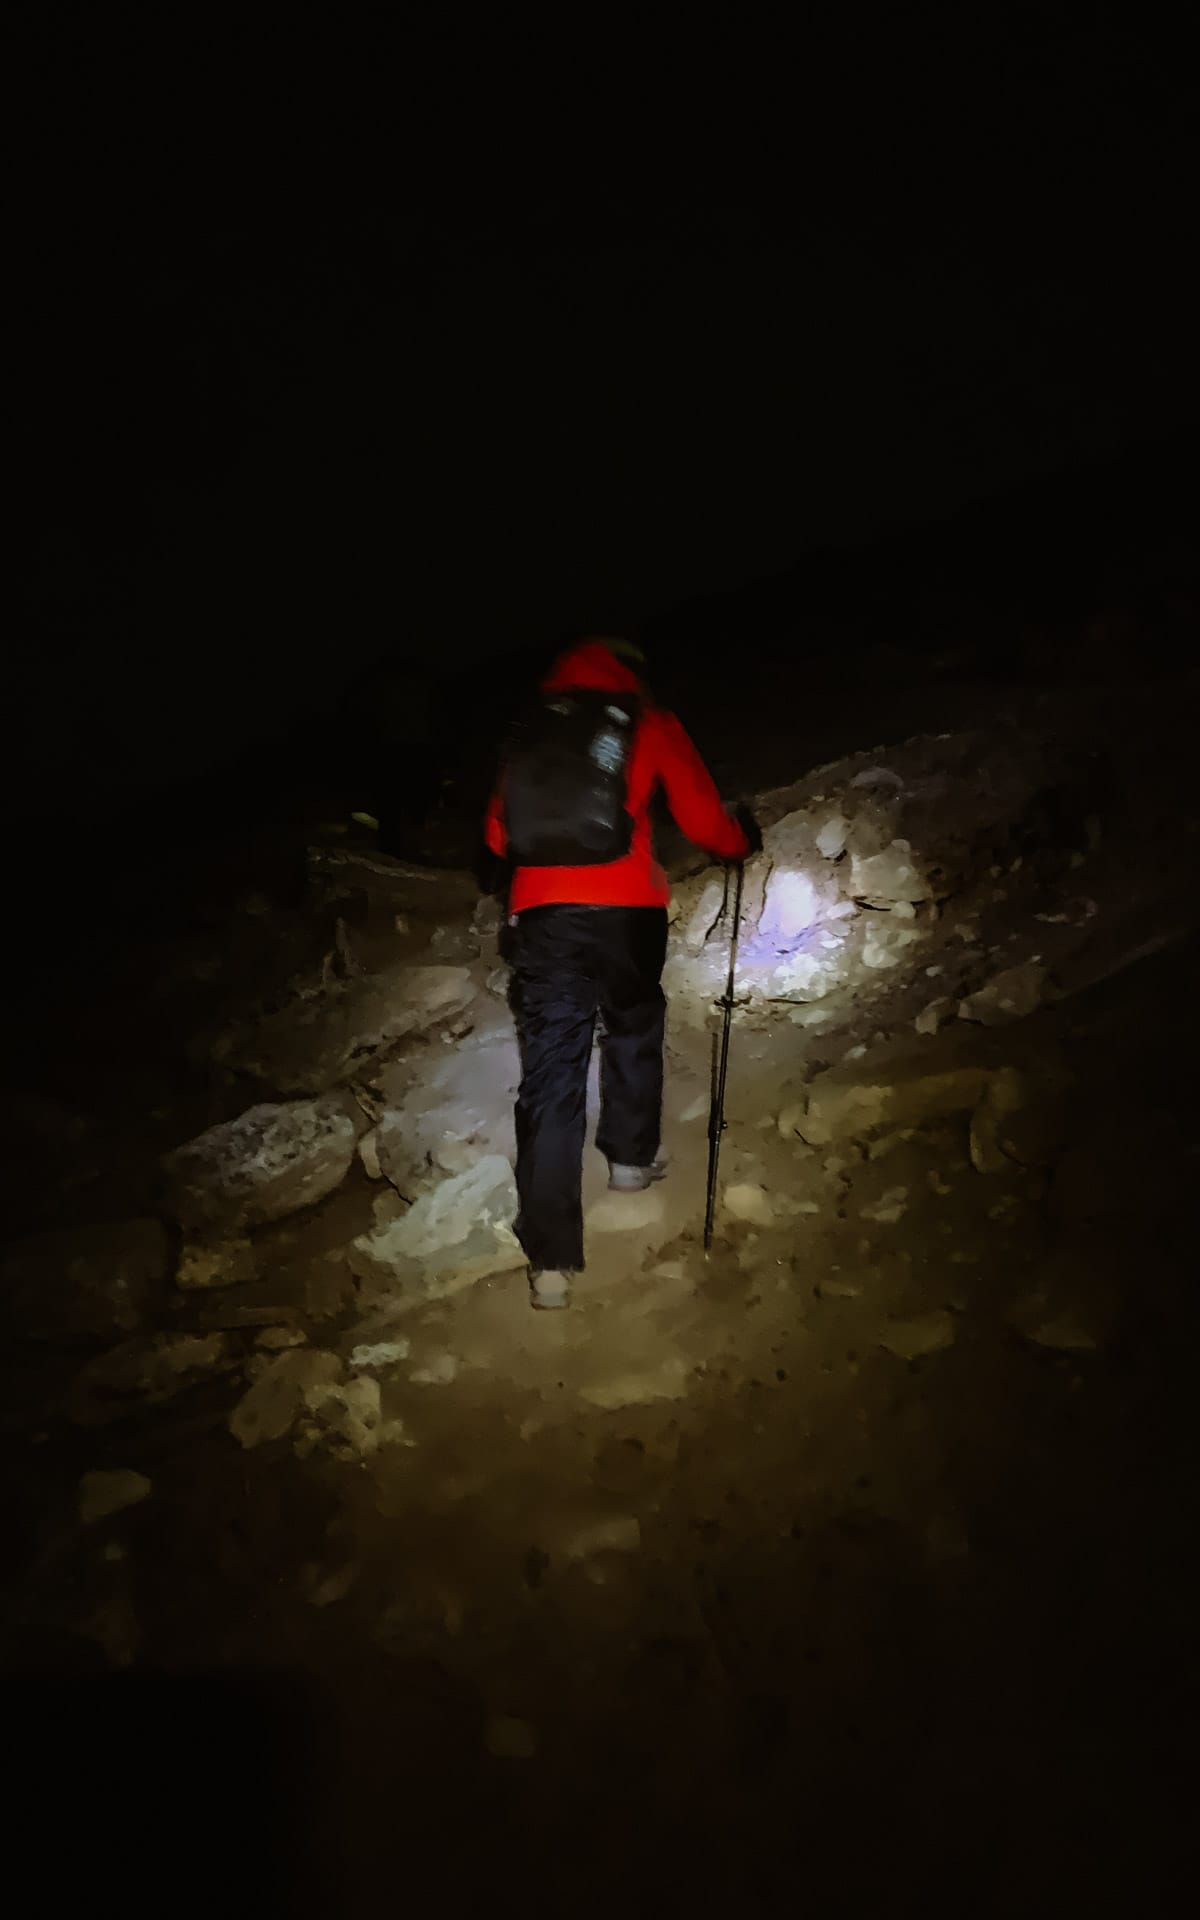
Early morning ascent up Gokyo Ri
Our guide noticed the weather was starting to shift. After several days of sunshine, the forecast for our Gokyo Ri ascent the next day showed snow and clouds moving in. That would mean missing the expansive view of the world’s highest peaks that we came there for!
Luckily our guide had 12 years of experience and told us that our best chance of seeing anything would be to leave for the climb at 4:00 AM.
We woke up at 3:30 AM, grabbed our headlamps and hiked in the pitch black for an hour straight up the mountain. We were nervous about visibility due to lightning far away in the distance but welcomed the first signs of sunlight.
An hour later, we reached the summit and were surprised to see blue skies and visible peaks! We were up there for a whole hour admiring the view. It really was the most incredible view we've ever seen.

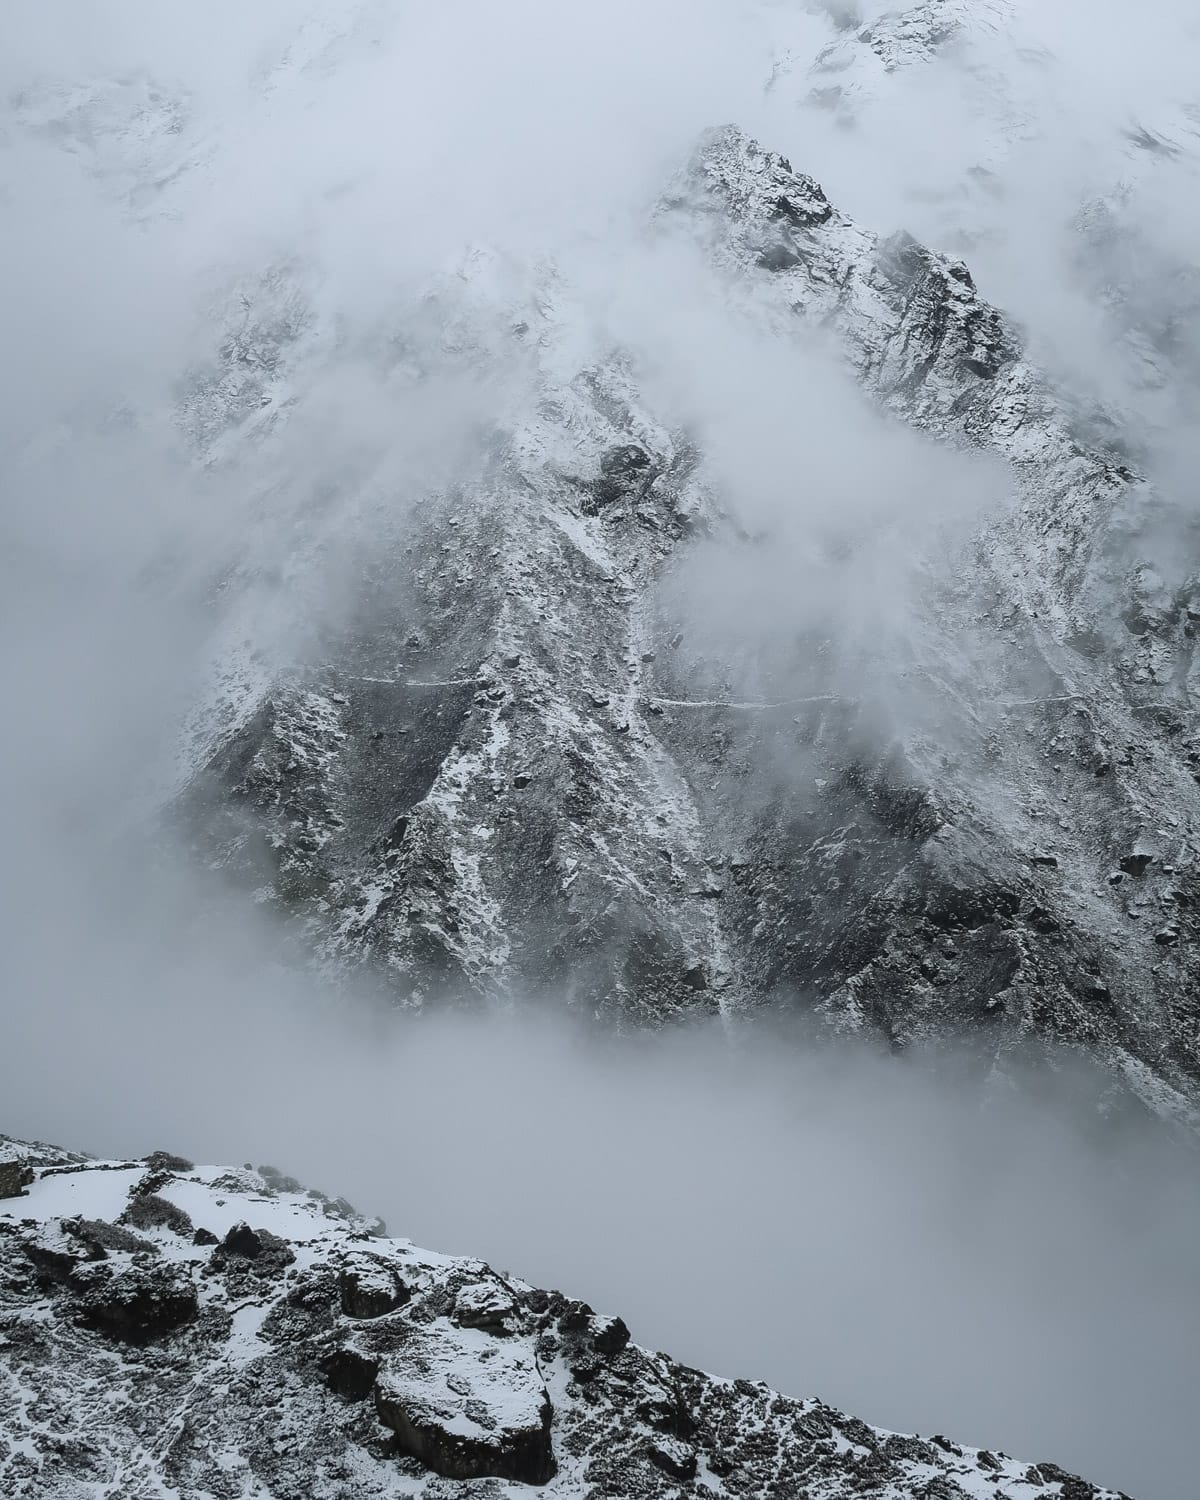
During our descent, clouds from the valley started rising quickly. That beautiful view disappeared in a matter of minutes. If we left just one hour later we would have missed it.
We felt so bad watching people hike up into the fog, hoping to see the view they’d come all that way for.
The clouds soon turned heavy, and there was a huge snowfall! We made it out of Gokyo just in time before the snowfall got too heavy. People were stuck there for a couple days since the trail became too dangerous.
This was a perfect example of why having an experienced guide matters.
On our way back down, we passed groups led by less experienced guides who didn’t know the best time to leave that morning. Sadly, none of them got to see the view. We passed at least 30 people who would have started around 6 AM or later.
See what the trek was like in our Gokyo Lakes and Gokyo Ri vlog.
Lukla Airport: Risks, realities & alternatives
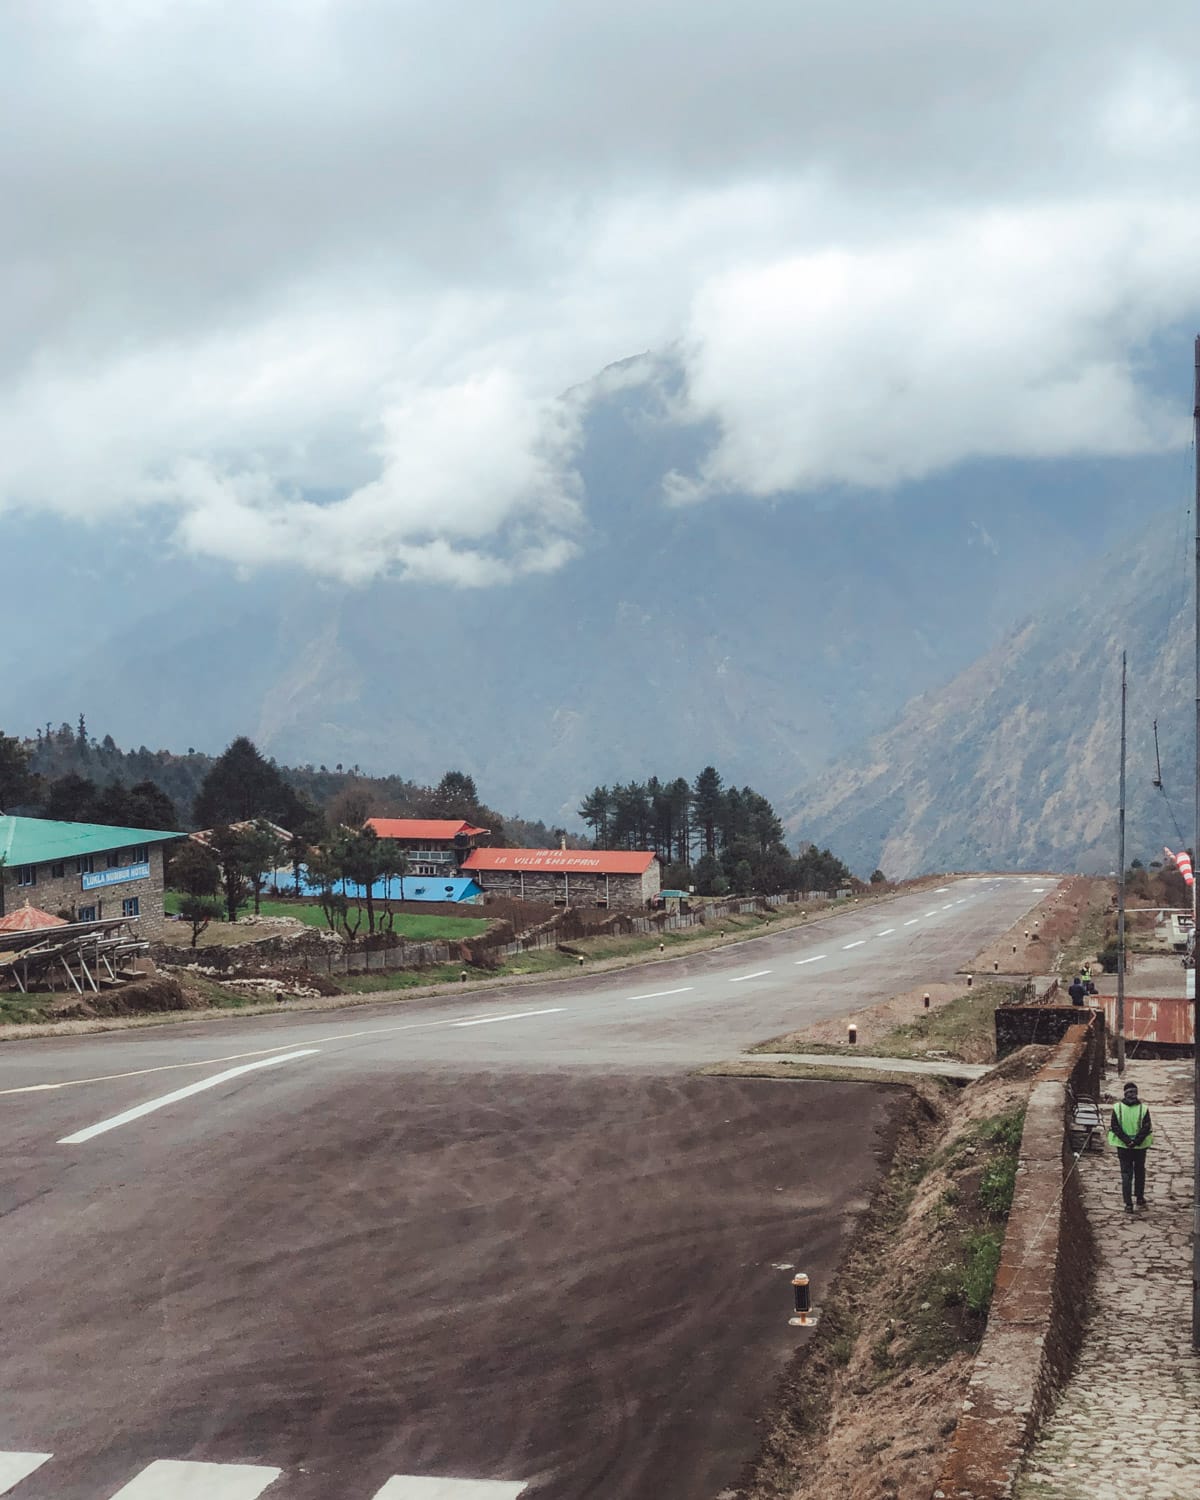
We took a 9-hour 4x4 ride and hiked an extra 50 km over three days to avoid flying into one of the world’s most dangerous airports: Lukla Airport (aka Tenzing–Hillary Airport). When you get there, you can see why.
The short, sloped runway drops off a cliff, the airport sits at a high altitude, and cloudy conditions make landing tricky. On top of that, many of the airlines operating the route don’t have the most reassuring safety records.
It was nice to trek on a less travelled path, however it was very frustrating every time we heard or saw a plane headed to Lukla. We were also sharing the trail with 3,000 pack mules in the region.
We decided to fly out of Lukla because fewer accidents have happened flying out than in. It was a harrowing experience, but we made it. As a crazy twist of fate, just two days later a plane crashed taking off from Lukla, killing 3. There were no passengers on board.
The thing is, hundreds of people fly every clear day to and from Lukla airport, so it's a matter of personal risk tolerance. In the past 15 years, Lukla Airport has had 60,000- 146,000 passengers per year.
In those 15 years, there have been six accidents resulting in fatalities. Two of those crashes happened before reaching the Lukla area and three of the six flights weren't carrying passengers.
How to avoid flying to Lukla Airport
If you don’t want to fly to or from Lukla, the best option is to fly to Phaplu Airport and hike from there. Just note that this adds around 100 km and 6 extra days to your trek.
If you want to avoid flying altogether, you can take a 9-hour drive from Kathmandu to Salleri, then begin your hike from there. The road gets bumpy and dusty in the final stretch, and doing it both ways adds about 8 days total to your itinerary.
Nepal Trekking Packing List
On our trek, we each carried a daypack and had an additional 8 kg of gear - clothes, sleeping bags, and other essentials - packed in a waterproof duffel bag carried by our porter.
Below is our list of what to pack for Nepal:
Clothing
|
Other Essentials
|
We hope you enjoyed this Gokyo Ri and Gokyo Lakes Trekking guide!
Trip Extension Options: combine your trip to Nepal with a trip to Bhutan. We were able to easily do this through our tour group, Himalayan Glacier.Get started on booking your trip to Nepal
- 🛏️ Book your accommodation in Kathmandu. We recommend staying in the city a few days before starting your trek.
- 🥾 Book your tour: Browse tour companies (we recommend Himalayan Glacier).
- 🛫 Book your flight to Kathmandu: use Skyscanner to compare flights across different airlines (we recommend booking direct with the airline however).
Save and pin this Gokyo Lakes and Gokyo Ri Itinerary & Trekking Guide for later:

Looking for more travel inspiration? Check out our list of fun adventure ideas for your next trip.